Representation State Transfer (ReST)
REST, or Representational State Transfer, is an architectural style for designing networked applications. It was introduced by Roy Fielding in his doctoral dissertation in 2000. RESTful systems are commonly used in web services development due to their simplicity, scalability, and ease of implementation.
Key concepts
- Resources: In a RESTful architecture, everything is considered a resource. These resources can be any kind of object, data, or service that can be accessed by a unique identifier. Examples of resources include users, articles, images, etc.
- Uniform Interface: REST emphasizes a uniform interface between components, which helps to simplify and standardize interactions. This uniform interface is typically based on using standard HTTP methods (GET, POST, PUT, DELETE) to perform operations on resources.
- HTTP Methods: RESTful APIs use HTTP methods to indicate the desired action to be performed on a resource. The common HTTP methods used in RESTful APIs are:
- GET: Retrieve a resource.
- POST: Create a new resource.
- PUT: Update an existing resource (or create a new one if it doesn’t exist).
- DELETE: Remove a resource.
- PATCH: Partially update a resource.
- Representations: Resources are represented in different formats, such as JSON, XML, or HTML. Clients and servers can negotiate the representation format using HTTP headers (e.g., Accept and Content-Type headers).
- Stateless Communication: In REST, communication between the client and server is stateless. This means that each request from the client to the server must contain all the information necessary to understand and process the request. Server-side sessions are not used to maintain state between requests.
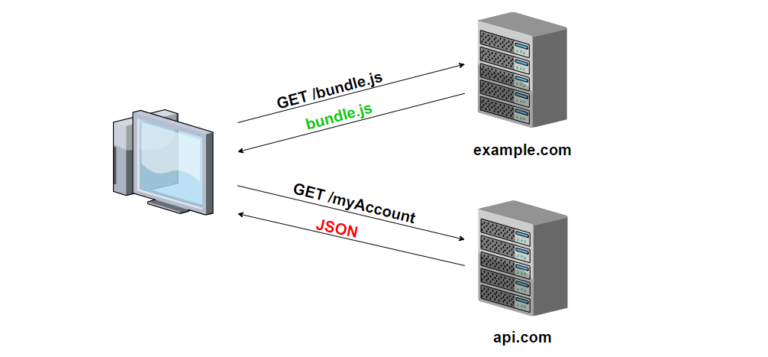
- URLs (Uniform Resource Locators): Resources are identified by URLs. A URL uniquely identifies a resource, and it follows a hierarchical structure that helps in organizing resources logically.
- Hypermedia as the Engine of Application State (HATEOAS): This principle suggests that a client interacts with a network application entirely through hypermedia provided dynamically by application servers. In simpler terms, responses from the server include links to related resources, guiding the client on what it can do next.
Constraints
REST, as an architectural style, is defined by a set of constraints that help guide the design of distributed systems. These constraints, originally outlined by Roy Fielding in his doctoral dissertation, are fundamental principles that RESTful systems must adhere to for them to be considered truly RESTful. Here are the key constraints of REST:
- Client-Server: The system should be divided into a client-server architecture. This separation allows the client and server components to evolve independently, improving scalability and simplifying the overall architecture.
- Statelessness: Each request from a client to the server must contain all the information necessary to understand and fulfill the request. The server should not store any client state between requests. This constraint simplifies the server’s logic, improves reliability, and enables better scalability.
- Cacheability: Responses from the server must explicitly indicate whether they can be cached or not. Caching can help improve performance, reduce server load, and minimize network traffic. Cache control directives provided by HTTP headers facilitate this constraint.
- Uniform Interface: This is a fundamental principle of REST, and it comprises several sub-constraints:
- Identification of Resources: Each resource in the system must be uniquely identified by a URI (Uniform Resource Identifier).
- Manipulation of Resources Through Representations: Clients interact with resources through representations, which are exchanged between the client and server. These representations, typically in JSON or XML format, contain the state of the resource and any related metadata.
- Self-Descriptive Messages: Messages exchanged between the client and server should include all the information necessary to understand their meaning. This includes using standard HTTP methods and status codes, as well as content negotiation to specify the format of representations.
- Hypermedia as the Engine of Application State (HATEOAS): Clients navigate the application state by following hyperlinks embedded in representations returned by the server. This constraint enables a more flexible and discoverable API design.
- Layered System: The architecture should be composed of multiple layers, with each layer only aware of the layers immediately above and below it. This allows for the encapsulation of concerns, such as load balancing, caching, and security, which can improve scalability and promote system evolution.
- Code-On-Demand (optional): Servers can optionally provide executable code (such as JavaScript) to be executed by the client. This constraint is rarely used in practice and is not essential for a system to be considered RESTful.
Adhering to these constraints helps ensure that RESTful systems are scalable, maintainable, and interoperable. While not every system claiming to be RESTful may strictly adhere to all constraints, the more closely a system aligns with these principles, the more RESTful it is considered to be.
Uniform resource interface
The Uniform Resource Interface is one of the key constraints of REST, emphasizing a standardized way of interacting with resources. It encompasses several principles, including the identification of resources, manipulation of resources through representations, self-descriptive messages, and Hypermedia as the Engine of Application State (HATEOAS). Here’s a breakdown of these principles with examples:
- Identification of Resources: Each resource in a RESTful system must be uniquely identifiable by a URI (Uniform Resource Identifier). URIs are used to locate and address resources on the server. Examples of resource URIs include:
https://api.example.com/usershttps://api.example.com/users/123https://api.example.com/products/456
- Manipulation of Resources Through Representations: Resources are represented in different formats, such as JSON, XML, or HTML. Clients interact with resources by exchanging representations with the server. For example:
- Retrieving a user’s profile information:
GET /users/123 - Creating a new user:
POST /users { "name": "John Doe", "email": "john@example.com" } - Updating an existing user’s information:
PUT /users/123 { "name": "Jane Doe", "email": "jane@example.com" }
- Retrieving a user’s profile information:
- Self-Descriptive Messages: Messages exchanged between the client and server should include all the information necessary to understand their meaning. This includes using standard HTTP methods and status codes, as well as content negotiation to specify the format of representations. For example:
- Using HTTP methods to perform operations:
GET /users/123 # Retrieve user POST /users # Create user PUT /users/123 # Update user DELETE /users/123 # Delete user - Returning appropriate status codes:
200 OKfor successful retrieval or update.201 Createdfor successful resource creation.404 Not Foundif a requested resource does not exist.400 Bad Requestif the request is malformed.
- Using HTTP methods to perform operations:
- Hypermedia as the Engine of Application State (HATEOAS): This principle suggests that clients navigate the application state by following hyperlinks embedded in representations returned by the server. The server provides links to related resources, guiding the client on what actions it can take next. For example:
GET /users/123 { "name": "John Doe", "email": "john@example.com", "links": [ { "rel": "self", "href": "/users/123" }, { "rel": "edit", "href": "/users/123/edit" }, { "rel": "delete", "href": "/users/123/delete" } ] }
In summary, the Uniform Resource Interface in RESTful systems provides a standardized way to identify, manipulate, and interact with resources, promoting simplicity, scalability, and interoperability in distributed systems.
HTTP request methods (verbs) and ReST operations
HTTP request methods are mapped to different operations in a RESTful API based on the intent of the operation being performed on a resource. Here’s a breakdown of how HTTP methods are commonly mapped to CRUD (Create, Read, Update, Delete) operations:
- GET: The
GETmethod is used to retrieve a representation of a resource or a collection of resources from the server. It is used for read-only operations where no modification of the resource on the server is expected. For example:GET /users: Retrieve a list of users.GET /users/{id}: Retrieve a specific user with the given ID.
- POST: The
POSTmethod is used to create a new resource on the server. It typically involves sending data to the server in the request body, which the server then processes to create the new resource. For example:POST /users: Create a new user with the provided data.
- PUT: The
PUTmethod is used to update an existing resource on the server. It replaces the entire resource with the data provided in the request body. For example:PUT /users/{id}: Update the user with the given ID with the provided data.
- PATCH: The
PATCHmethod is similar toPUTbut is used to apply partial modifications to a resource. It only updates the fields specified in the request body, leaving the rest of the resource unchanged. For example:PATCH /users/{id}: Update specific fields of the user with the given ID.
- DELETE: The
DELETEmethod is used to remove a resource from the server. It indicates that the client wants to delete the resource identified by the request URI. For example:DELETE /users/{id}: Delete the user with the given ID.
These mappings align with the principles of REST, where resources are manipulated using a uniform interface consisting of standard HTTP methods. By using HTTP methods in this way, RESTful APIs provide a clear and consistent way to perform CRUD operations on resources, making them easy to understand and use.
Content negotitation
Content negotiation is a mechanism used in the HTTP protocol, primarily within RESTful architectures, to allow a client and a server to agree on the most appropriate representation of a resource to exchange. It enables the server to serve different representations of a resource (such as JSON, XML, HTML) based on the client’s preferences and capabilities.
There are two main types of content negotiation:
- Client-driven content negotiation: In this approach, the client specifies its preferred representation formats using the
Acceptheader in the HTTP request. The server examines theAcceptheader and selects the most appropriate representation based on the available options. For example, a client might specify that it prefers JSON over XML, and the server will respond with JSON if it’s available.ExampleAcceptheader:Accept: application/json, text/html - Server-driven content negotiation: In this approach, the server examines the request and selects the most appropriate representation based on factors such as the client’s capabilities, the resource being requested, or other context-specific information. The server then includes the chosen representation format in the
Content-Typeheader of the response. This method is often used when the client does not specify its preferences or when the server has specific knowledge about the client’s capabilities.ExampleContent-Typeheader in the response:Content-Type: application/json
Content negotiation allows for flexibility in the communication between clients and servers. It enables systems to support multiple representation formats without requiring separate endpoints for each format, which enhances interoperability and simplifies the development of RESTful APIs. Additionally, content negotiation promotes efficiency by allowing clients to receive data in a format that best suits their needs and capabilities.
HTTP Response status codes
HTTP response status codes are standardized codes returned by a server in response to a client’s request. They convey the result of the server’s attempt to understand and satisfy the request. Here are some commonly used HTTP response status codes along with their applications:
- 200 OK:
- This status code indicates that the request was successful.
- It is commonly used for successful GET requests or successful POST requests that result in the creation of a new resource.
- 201 Created:
- This status code indicates that the request has been fulfilled and resulted in the creation of a new resource.
- It is commonly used in response to successful POST requests that create a new resource.
- 204 No Content:
- This status code indicates that the server successfully processed the request but is not returning any content.
- It is commonly used in response to successful DELETE requests or successful PUT/PATCH requests that do not require a response body.
- 400 Bad Request:
- This status code indicates that the server cannot process the request due to client error, such as invalid syntax or missing required parameters.
- It is commonly used when the request payload is malformed or when the client sends invalid data.
- 401 Unauthorized:
- This status code indicates that the request requires user authentication.
- It is commonly used when the client needs to authenticate itself to access the requested resource, but the authentication credentials are missing or invalid.
- 403 Forbidden:
- This status code indicates that the server understood the request but refuses to authorize it.
- It is commonly used when the client does not have permission to access the requested resource, even after authentication.
- 404 Not Found:
- This status code indicates that the server cannot find the requested resource.
- It is commonly used when the client requests a resource that does not exist on the server.
- 405 Method Not Allowed:
- This status code indicates that the requested HTTP method is not allowed for the requested resource.
- It is commonly used when the client attempts to use an unsupported HTTP method (e.g., POST instead of GET) for a specific endpoint.
- 406 Not Acceptable:
- This status code indicates that the server cannot generate a response that meets the criteria specified by the client’s Accept header in the request.
- It is commonly used when the server is unable to provide a response in any of the formats specified by the client (e.g., JSON, XML) or when the requested resource cannot be served in a format acceptable to the client.
- This status code may also be used to indicate that the client’s requested content type is not supported by the server.
- Status code 406 is particularly relevant in the context of content negotiation in RESTful APIs, where the server attempts to match the client’s preferred media types with the available representations of a resource. If none of the available representations match the client’s preferences, the server may respond with a 406 status code to indicate that it cannot satisfy the request.
- 500 Internal Server Error:
- This status code indicates that the server encountered an unexpected condition that prevented it from fulfilling the request.
- It is commonly used to represent various types of server-side errors, such as unhandled exceptions or misconfigurations.
These are just a few examples of commonly used HTTP response status codes. There are many more status codes defined by the HTTP specification, each serving a specific purpose in communicating the outcome of a client’s request to the server.
JWT
JWT stands for JSON Web Token. It’s a compact, URL-safe means of representing claims to be transferred between two parties. The claims in a JWT are encoded as a JSON object that is digitally signed using a secret or a public/private key pair.
Here’s a breakdown of the components and how JWT works:
- Header: The header typically consists of two parts: the type of the token, which is JWT, and the signing algorithm being used, such as HMAC SHA256 or RSA. It is Base64Url encoded to form the first part of the JWT.
- Payload: The payload contains the claims. Claims are statements about an entity (typically the user) and additional data. There are three types of claims: registered, public, and private claims. The payload is also Base64Url encoded to form the second part of the JWT.
- Signature: To create the signature part, you take the encoded header, the encoded payload, a secret, and the algorithm specified in the header and sign that.
Here’s an example of a JWT:
eyJhbGciOiJIUzI1NiIsInR5cCI6IkpXVCJ9.eyJzdWIiOiIxMjM0NTY3ODkwIiwibmFtZSI6IlZpbm9kIEt1bWFyIEtheWFydGF5YSIsImVtYWlsIjoidmlub2RAdmlub2QuY28iLCJwaG9uZSI6Ijk3MzE0MjQ3ODQiLCJpYXQiOjE1MTYyMzkwMjJ9.wrcDJyh-ebqIMPFLXKvtw8-4X6l9Cf3FuqHirtHlk4oThis JWT consists of three parts separated by dots:
- Header:
eyJhbGciOiJIUzI1NiIsInR5cCI6IkpXVCJ9 - Payload:
eyJzdWIiOiIxMjM0NTY3ODkwIiwibmFtZSI6IlZpbm9kIEt1bWFyIEtheWFydGF5YSIsImVtYWlsIjoidmlub2RAdmlub2QuY28iLCJwaG9uZSI6Ijk3MzE0MjQ3ODQiLCJpYXQiOjE1MTYyMzkwMjJ9 - Signature:
wrcDJyh-ebqIMPFLXKvtw8-4X6l9Cf3FuqHirtHlk4o
JWTs are commonly used for authentication and information exchange in web applications. When a user logs in to a web application, the server generates a JWT and sends it back to the client. The client then includes the JWT in subsequent requests to the server to authenticate the user. Since JWTs are self-contained and contain all necessary information about the user, there’s no need to store user sessions on the server, which makes JWTs suitable for stateless authentication mechanisms.
JWT in ReST
JWT (JSON Web Tokens) can be used in RESTful APIs for implementing authentication and authorization mechanisms. Here’s how JWT can be utilized in a RESTful architecture:
- Authentication:
- When a user logs in to a web application, the server verifies the user’s credentials.
- Upon successful authentication, the server generates a JWT containing a set of claims (such as user ID, username, role, etc.).
- The server signs the JWT using a secret key or a private key if using asymmetric encryption.
- The JWT is then sent back to the client as part of the response body or in an HTTP header (commonly
Authorizationheader). - The client stores the JWT, typically in local storage or a cookie, and includes it in subsequent requests to the server.
- The server verifies the JWT’s signature to ensure its authenticity and extracts the claims to authenticate and authorize the user.
- Authorization:
- Once the server verifies the JWT and extracts the claims, it can use the information contained in the JWT to authorize the user’s access to protected resources.
- For example, based on the user’s role or permissions included in the JWT claims, the server can determine whether the user is authorized to perform certain actions or access specific endpoints.
- If the user lacks the necessary permissions, the server can return an appropriate HTTP status code (e.g., 403 Forbidden) to deny access to the resource.
- Token Refreshing:
- JWTs typically have an expiration time (specified in the
expclaim), after which they become invalid. - To handle expiring tokens, the client can include a refresh token along with the JWT.
- When the JWT expires, the client can use the refresh token to request a new JWT from the server without requiring the user to log in again.
- The server verifies the refresh token and issues a new JWT if the refresh token is valid, extending the user’s session.
- JWTs typically have an expiration time (specified in the
- Token Revocation:
- In some scenarios, it may be necessary to revoke a JWT before it expires (e.g., if a user’s account is compromised).
- Token revocation can be implemented by maintaining a blacklist of revoked tokens on the server.
- When a JWT is revoked, its token identifier (typically the
jticlaim) is added to the blacklist. - Before accepting a JWT, the server checks whether its token identifier is present in the blacklist to prevent revoked tokens from being used.
Overall, JWT provides a secure and efficient way to implement authentication and authorization in RESTful APIs, enabling stateless communication between clients and servers.
HTTP request with JWT
Here’s an example of how to send an Authorization header with a JWT token in an HTTP request using JavaScript’s Fetch API:
const jwtToken =
  'eyJhbGciOiJIUzI1NiIsInR5cCI6IkpXVCJ9.eyJzdWIiOiIxMjM0NTY3ODkwIiwibmFtZSI6Ik5vbWUgTm9tZSIsImlhdCI6MTY0NTA2MjE2Mn0.Y3T1lSLKKvA3k3cbvl81R-ty5XAJc23D55Z7W7WVNN8';

fetch('https://api.example.com/resource', {
  method: 'GET',
  headers: {
    Authorization: `Bearer ${jwtToken}`,
  },
})
  .then((response) => {
    if (!response.ok) {
      throw new Error('Failed to fetch resource');
    }
    return response.json();
  })
  .then((data) => {
    console.log('Resource:', data);
  })
  .catch((error) => {
    console.error('Error:', error);
  });
In this example:
- The JWT token (
jwtToken) is stored in a variable. - The Fetch API is used to send an HTTP GET request to
https://api.example.com/resource. - The
headersoption of the request includes an Authorization header with the valueBearer ${jwtToken}, where${jwtToken}is replaced with the actual JWT token. - The server can then parse the Authorization header on the server-side to authenticate and authorize the user based on the JWT token.
In RFC2616 format (which is the HTTP/1.1 specification), the Authorization header with a JWT token would be represented as follows:
GET /resource HTTP/1.1
Host: api.example.com
Authorization: Bearer eyJhbGciOiJIUzI1NiIsInR5cCI6IkpXVCJ9.eyJzdWIiOiIxMjM0NTY3ODkwIiwibmFtZSI6Ik5vbWUgTm9tZSIsImlhdCI6MTY0NTA2MjE2Mn0.Y3T1lSLKKvA3k3cbvl81R-ty5XAJc23D55Z7W7WVNN8
Accept: application/json
In this format:
- The HTTP method is specified first (e.g., GET).
- The requested resource’s URI is provided (e.g., /resource).
- The HTTP version is specified (e.g., HTTP/1.1).
- The Host header specifies the hostname of the server.
- The Authorization header includes the type of authentication (Bearer) followed by the JWT token.
This format is compliant with the HTTP/1.1 specification defined in RFC2616 and can be used to send HTTP requests with JWT tokens to servers.